Thursday, July 23, 2015

Delicious Crockpot Cube Steak and Gravy


Delicious Crockpot Cube Steak and Gravy


Hi all.
I picked this recipe because my daughter likes cube steak. And normally I cook it the same every time. I soak it in Italian dressing and then fry it in a skillet with a little more Italian dressing.

But this recipe is so much better! And easy. This could be ready for you when you get home from work tonight!


Crockpot Cube Steak and Gravy
4-6 cube steaks
2 cans of cream of mushroom soup
1 packet of onion soup mix
3/4 cup of water

Pour all the ingredients in to the crockpot and then cook on low for 8 hours or high for 4 hours.

Serve with mashed potaotes or rice and a vegetable.

Delicious!!!

I hope you enjoy.
Have a wonderful day.

Friday, June 12, 2015

Crockpot Cheesy Chicken and Rice


Crockpot Cheesy Chicken and Rice


Hello everyone!
How is every one doing? Here in Rochester, we have been getting way too much rain. I like it, just makes it hard to do anything, like my new favorite hobby HIKING! I just love taking my dogs and going hiking, running up hills and experiencing nature. It's a lot of fun. I really need hiking boots though, my sneakers aren't cutting it.

This crockpot dinner is so easy, there is hardly any prep and it's so good. But I did change a few things to make it more tasty and healthy.

Crockpot Cheesy Chicken and Rice

4 pieces of chicken breast (skinless and boneless)
2 cans of cream of chicken (you can use no fat, no salt or regular)
1 can of corn (drained)
2 cups of rice (brown or white) or you can use quinoa (prepared according to the directions on the box)
2 cups of cheddar cheese
1 can of black beans (drained) (they aren't in the picture)

In the crockpot put the 4 pieces of chicken on the bottom and top with the 2 cans of cream of chicken soup. Turn the crockpot on for 4 hours on high or 8 hours on low.

Add rice, beans, corn 20 minutes before the cooking time is up. And then when the time is up, add the 2 cups of cheese and mix well.

Hooray, you have a delicious dinner and you barely had to work for it,

A couple tips, if you are really pressed for time, make the rice the night before that way you don't have to cook it and throw the chicken and soup in the crockpot bowl and stick in the the fridge, that way all you have to do in the morning is put in the actual crockpot and turn on. Simple.

Wednesday, May 6, 2015

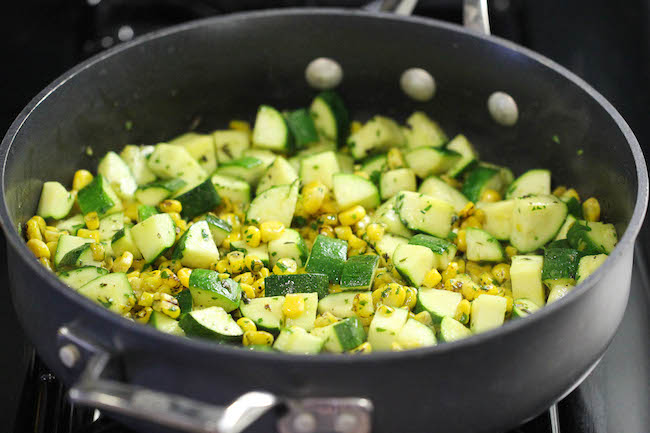
Parmesan Zucchini and Corn

Parmesan Zucchini and Corn - A healthy 10 minute side dish to dress up any meal. It's so simple yet full of flavor!

Parmesan Zucchini and Corn

Hi everyone.
It's a beautiful day in the neighborhood and there is a good recipe to be had by all.
This recipe is by far one of the best I have had in a long time.
I love corn, love it!
Then there is zucchini, this is one of those veggies mom made you eat when you were younger and you hated it. But as you got older, it became delicious!
Well this recipe has both and let me tell you, it is so good, I would eat it every day!!!
EVERYDAY!

PARMESAN ZUCCHINI AND CORN

INGREDIENTS
2 tablespoons olive oil
2 cloves garlic, minced
4 zucchinis, diced
1 cup corn kernels, frozen, canned or roasted
1/4 teaspoon dried basil
1/4 teaspoon dried oregano
Kosher salt and freshly ground black pepper, to taste
Juice of 1 lime
2 tablespoons grated Parmesan, or more, to taste
  • Heat olive oil in a large skillet over medium high heat. Add garlic to the skillet, and cook, stirring frequently, until fragrant, about 1 minute.
  • Add zucchini, corn, basil, and oregano. Cook, stirring occasionally, until zucchini is tender and cooked through, about 3-4 minutes; season with salt and pepper, to taste. Stir in lime juice.
  • Serve immediately, sprinkled with Parmesan.

Enjoy this dish, I promise you will love it.

Friday, May 1, 2015

Baked Sour Cream Chicken


Baked Sour Cream Chicken

Hi everyone.
The sunny weather has finally arrived here in Rochester, NY.
It took forever to get here.
It's still chilly at night, but that is ok with me, pretty soon it will be hot at night and my body doesn't like that.

So this chicken is delicious but I did make a few additions.

This is a recipe found on budgetsavvydiva.com.

Ingredients
  • 1 Pound of Chicken
  • 1 Teaspoon of Parsley
  • ¼ Cup of Parmesan Cheese
  • ¼ tsp Red Pepper Flakes
  • Pinch of Salt
  • ½ Cup of sour cream, mixed with a little mayo (mayo is an addition)
  • Panko bread crumbs (addition)
Instructions
  1. Preheat oven to 350
  2. In a bowl combine - sour cream, mayo, parsley, Parmesan cheese, red pepper flakes and salt
  3. Using a kitchen brush - brush the sour cream/mayo mixture all over the chicken - place chicken in a casserole dish
  4. Sprinkle Panko bread crumbs on top of the chicken, to your liking.
  5. Bake for 35 minutes or till cooked ( 20 minutes if you are making chicken tenders)
  6. Enjoy!
Give it a try and let me know what you think. Really easy, throw in the oven recipe.

Monday, March 2, 2015

Loaded Home Fries


Loaded Home Fries

Hi ya'll.
How was your weekend? Did you do anything fun or make any special craft projects?
I made some good food for the family, worked on a new amigurumi and made a couple scrapbook pages for a gift that we are giving to my husband's Grandmother for her 80th birthday. So all in all, it was a very productive weekend for me, which hasn't happened in a long time.

I can't wait to share it all with you.

But let me share this amazing dish first.
This can be one of those eat alone, side dish or just a snack kind of things. It's really easy and super delicious.

Loaded Home Fries
One bag of small yellow potatoes
1/2 lb of bacon (I used the already cooked kind)
1 tbsp. Olive oil
1 tbsp. Minced Garlic
2 tsp. Parsley
Shredded Mild or Sharp Cheddar Cheese
Salt
Black Pepper

Directions: Cut the potatoes in small cubes. Chop the bacon in smallish pieces. Take a Tupperware® bowl with a lid and put all the ingredients into it, except for the cheese. Put the lid on tight and give it a couple good shakes. Dump it onto a greased baking sheet. Cook at 400° for 30 minutes and then mix, cook another 30 minutes and then mix it again. Add the cheese to the top and bake for another 10-15 minutes.

Like I said this makes a great side dish, snack or something to eat alone. If you throw in some precooked beef or chicken, it might be even tastier!!!

I hope you enjoy this dish.
Thank you for visiting my blog.

Have a wonderful day.

Image result for tina signature


Saturday, February 28, 2015

Slow Cooker Crack Chicken

Slow Cooker Crack Chicken.. super easy Creamy Cheesy Shredded Chicken!! SO many possibilities!

Slow Cooker Crack Chicken

Hi ya'll. I ope everyone is having a wonderful weekend. Here we are breaking the ice dams and salting the build up of snow, so we don't have water pouring in to the house. Fun times digging out from 43 inches of snow in February, the coldest month on record ever here in New York. Brr....

Anyway, the other day I made this slow cooker crack chicken and I was disappointed. The recipe is slightly flawed. It has way too much cream cheese in it. I like cream cheese, I don't love it, and I certainly don't want my entire meal to taste like only cream cheese. Well this is what the recipe did. The whole thing tasted like I was only eating cream cheese. Yuck.

Original recipe:
as found on cookiesandcups.com

2lbs boneless chicken breast
2 packets of dry ranch dressing mix
2 packages of cream cheese
8 oz. bacon

Take the first 3 ingredients and put them in the crock pot. 4 hours on high, 8 hours on low. Shred the chicken.
Before the time is up, cook bacon until it's crispy and break it up into little pieces. Add to the crock pot and stir.

To eat, spoon onto bun and serve.

My tweaked recipe:
2 lbs of chicken breast
1 packet of dry ranch dressing mix
1 package of Greek cream cheese
8 oz bacon

Take the first 3 ingredients and put them in the crock pot. 4 hours on high, 8 hours on low. Shred the chicken.

Before the time is up, cook bacon until it's crispy and break it up into little pieces. Add to the crock pot and stir.

To eat, spoon onto bun, add shredded Colby jack cheese to the top  and serve.

This slight tweak in the recipe makes it a lot better and in my opinion, edible.
Either way though, I am not a huge fan. I always try to find different recipes to make and something that doesn't take hours to throw together. I wasn't happy with the outcome of this dish.

If you try this recipe, let me know what you think.
If you aren't someone who wants to bath in cream cheese, and only just likes it, try my recipe, if you could lather yourself in cream cheese and it still wouldn't be enough cream cheese, try the original. Either way, good luck and happy eating.

Thank you for visiting my blog.
Have a wonderful day!

Image result for tina signature


Wednesday, February 25, 2015

Swiss Cheese Chicken Bake


Swiss Cheese Chicken Bake

Hi everyone. 
I am always looking all over the internet for really good dinner dishes that I can put together ahead of time and then throw in the oven. Some of my work days are 11 -12 hours long and some are a little shorter but either way when I get home, the last thing I feel like doing is cooking. I just want to be able to cook a good meal, fast.

This dish is delicious. It's so good, I feel guilty eating it.

Swiss Cheese Chicken Bake

3-4 pieces of boneless chicken cut up
6 slices of Swiss cheese 
1 can of cream of chicken or cream of mushroom soup
1/4 cup milk
1/3 box of chicken flavored stuffing mix

Take a casserole dish and spray it lightly with cooking spray, layer the chicken on the bottom of the dish, making sure to spread it out evenly. Lay the Swiss cheese slices over the chicken, you should be able to get 2 rows of 3 slices in a 9x13 pan. Mix the cream soup with the 1/4 cup of milk and pour over the cheese.

Now this is where you stop if you are making this ahead of time. Cover it in plastic wrap and put it in the fridge.

The last step is to take 1/3 to 1/2 box of stuffing mix and sprinkle it over the top. I don't completely cover the whole thing, but I get most of it.

Then you bake at 350° for 45 minutes. This is where I check it and see if it's done or not. If not throw it back in the oven for another 15 minutes.

This can be served with all kinds of sides; rice, mashed potatoes or egg noodles. And of course a veggie.

To make this meal healthier, use reduced fat or fat free soup and cheese. Your family will never know since the stuffing is what gives everything the most flavor. Also try other cheese, colby jack would probably be great too.

I hope you enjoy this recipe.
Thank you for stopping by to visit.

Have a wonderful day!

Friday, February 20, 2015


Roasted Cauliflower

Hi everyone. It's been a while. Since I got my current job, I haven't really had much free time to update my blogs. And I love blogging about food. It's a feel good subject to talk about. Food makes people happy, sometimes it makes you remember things that occurred, giving you a sense of nostalgia. And that's what I love about it, it's memory triggering abilities. Like my grandmother's meatballs, when I make them, I am instantly transported back to when I was a little girl, and my grandmother would spend all day making meatballs. Then she would make the pasta I liked, which was not spaghetti noodles, I wouldn't eat those, I would only eat rigatoni. And oh how I loved her pasta. She would leave some meatballs out of the sauce just for me (I was a difficult child and didn't want them combined). She would put them in a bowl and I knew those were just for me. My grandmother would tie a apron of hers around my neck before I ate, because I would make a mess. Then we would dig in. Now that she is gone, and all I have are memories of her, and I miss her so much.

So I made roasted cauliflower for dinner last night as one of our sides. My family is not a huge fan of cauliflower, myself included. But the way I cooked it, it was delicious. I am definitely going to make it again.

Roasted Cauliflower Recipe:

One head of cauliflower
2 tbsp. Garlic - minced
4 tbsp. Olive Oil
1 tsp. Salt
1 tsp. Black Pepper

1. Take the head of cauliflower and cut off the florets, separating them to what size you think is small enough. I made mine about medium size.
2. Take a Tupperware® bowl with a lid, add in the olive oil, garlic, salt and pepper. Then add the florets and put the top on the bowl. Give it a couple good shakes so the cauliflower gets coated in the mixture.
3. Spread it out on a baking sheet.
4. Cook at 350° for 20 minutes or until brown.  Stirring a couple times to get all sides brown. If it's not dark enough for you, turn up the heat to 385°.

It's a really good side dish and good for you.

Thank you for checking out my blog today. Hopefully soon I will have more awesome recipes to share.

Image result for tina signature